Thursday, February 18, 2010

Bye-bye brass!

I'm NOT a big fan of shiney brass objects. Not. A. Fan. In fact, one of the first "home improvement" projects I made my husband do was change out the tarnished brassy french handles on the doors. They are now a nice, uniform satin nickel. Nice.

But that project ended up being a LOT more expensive than I would have thought. After all, you can't change the handles ($26/each) and leave the ugly brass hinges, too, right? And apparently we have a LOT of doors in our house.

So when I look at our shiney brass ceiling fans, I become a little deflated. I know that you can find cheap-o fans, but the fans we have may be ugly, but they are GOOD fans! I can't justify the expense to replace them.

Hello, Spray Paint.

My best friend.

So while my hubby was out of town this week, I decided to give it a go, and try painting the brassy awefulness that was clinging to the family room ceiling.

I failed to get a true "before" picture, since I was in such a mad rush to get it down, so here's a half-hearted one:
Just imagine it with fan blades :)

And to be fair, this was one of the better looking brass fans, since it wasn't completely brass... it did have that going for it. Also, I liked that because I didn't have to take down the ENTIRE fan for this project. I just took off the blades, the light kit, and the grill thingy.
I taped over all the electrical work with newspaper & masking tape in a very technically exacting method.... uh, sure.
I gave everyone a good coat of primer.
The screws I just threw in a little box, and sprayed while I shook the box a little. Seems to have worked :)

Now, as I was reassembling my masterpiece, I ran into a bit of a dilemna. Since I didn't take apart the whole thing, I realized that the little pull-chain for the fan was still attached within the fan motor part, and there was no apparent way for me to remove it for spraying outside. I couldn't leave it as-is, because it really stood out next to the light nickel.... Enter Grocery Bag Spray Paint Accessory.

Yes, that's right, I grabbed a bag, kind of cradled the little chain inside, and did some blind spraying. Maybe not the most efficient use of spray paint, but hey, it got the job done! And I didn't find any "snow" on the fabric of my couch underneath when I was finished. Nice.

So here she is, with some new frosted shades to replace the dated cut glass ones (please ignore the hideous curly-shirley light bulbs that my hubby is obssessed with. Someday I'll switch them out when he won't notice!):

Sleek!


Linking up to Transformation Thursday at
The Shabby Chic Cottage

Thursday, February 11, 2010

Free {repurposed} curtains


We haven't had "real" curtains in our master bedroom, well, ever. I've been working on decorating the bedroom after 4 years of living here, and it's coming along slowly. I painted the room from dusty pink to a nice brown, I painted a CL dresser, we had already bought some Shabby Chic Target furniture from CL, and I bought a lovely duvet cover (have yet to get the comforter, but who am I to be picky?). Everything is quite plain. I got to looking at the naked windows, bemoaning the fact that I don't have a budget to buy ANY supplies right now. Well, I was reading on the Nesting Place about her Lessons Learned from Houses Past, and she was talking about how back in the day she used Kmart bedsheets to make her living room curtains. Inspiration! I checked the closets for any extra sheets, but realized that I had already donated them to our Community Services at our church. Bummer.

After moping around for a while, I walked by the dining room and stopped dead in my tracks.

The tablecloth.

This tablecloth was given to me by my MIL, who bought it at goodwill or something. It's served us well. It's a lovely color of green with some decorative trim type stuff. But it's a solid color. We have a vespers service at our house every Friday night, which includes food for about 15-20 young adults. Solid tablecloths are not my friend. This poor little lovely had grease stains here and there, but I loved the color, so I kept using it. But now I grabbed it off of the table and ran upstairs to the sewing room. Before I could change my mind, I folded it in half and cut it.

Then I folded the raw edge over and over once more to create the rod pocket
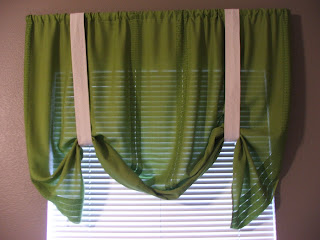
I knew that these would not be long enough to do panels, so I decided to make them a swaggy valance thing. For the lift-up tie things (love all my terminology?) I used scraps of cavas left over from my living room curtains. I just cut them into strips, sewed up the long sides to make a tube, then turned the tubes inside out.
I then pressed it down to create crisp edges.
Then I sewed the short sides together to make a loop.
I slipped them over the curtain rod, and voila! New curtain-swaggy-valance thingies.
Oh, and there's another one on the other side of the bed, but that is my husband's side, and it has socks all over the floor. Thought I'd spare you that.

Lesson learned: You can pretty much always find something to repurpose in your house. My curtains were free, and I couldn't be more pleased with the result!


Linking up to Transformation Thursday at

The Shabby Chic Cottage

And


DIY Day @ ASPTL


Related Posts with Thumbnails